This is 1st part of the third post from the Data Manipulations with PowerShell series, where we are diving into the specific phase of data operation processes and apply/use PowerShell along the way.
Previous posts:
- Empower your Data Retrieval with PowerShell
- Make your Data Processing more efficient with PowerShell
During this phase data is being converted and modified from one format, structure, or representation to another. It involves manipulating and reorganizing data in order to make it suitable for a particular analysis, system, or application.
Data transformation is often performed before data analysis, modeling, or loading data into a target system. It helps in improving data quality, resolving inconsistencies, and ensuring data compatibility.
In general, the few common types of data transformation are:
- Data Cleaning – handling missing data, dealing with outliers, correcting errors, and resolving inconsistencies in the data. Used to ensure that data is accurate and reliable for further analysis.
- Data Integration – combines and merges data from different formats, structures, or databases into a unified format. Usually helps to create a consolidated view of the data, enabling comprehensive analysis.
- Data Discretization– transforms continuous data into categorical or ordinal data by creating bins or intervals. Often used to simplify complex relationships or reducing the impact of outliers.
- Data Encoding – converts categorical data into numerical representations to make it suitable for certain algorithms or models. Common encoding techniques include one-hot encoding, label encoding, and ordinal encoding.
- Data Normalization – scales numerical data to a common range or distribution. Used to prevent certain variables from dominating the analysis due to their larger magnitude.
- Data Reduction – reduce the dimensionality of the dataset while preserving important information. Examples include principal component analysis (PCA) and feature selection methods.
- Data Conversion – convert data from one format to another, such as converting CSV files to XML or JSON.
As part of our common procedure for this series, we will look into out of the box provided cmdlets as well the modules and scripts authored by awesome PowerShell community
Data Cleaning
Data cleaning itself have couple of items to deal with:
- Missing values
- Outliers
- Duplicates
- Inconsistency & errors
Out of the Box
In terms of the out of the box cmdlets, most of them are pretty familiar to us at this point. We used them a bunch in the previous (and most likely future) posts from these series. As usual our “one size fits all” are – Where-Object, Sort-Object, ForEach-Object and “old but gold” regular expressions.
Let’s look into some of the examples on how to apply PowerShell to Data Cleaning use cases.
Missing values
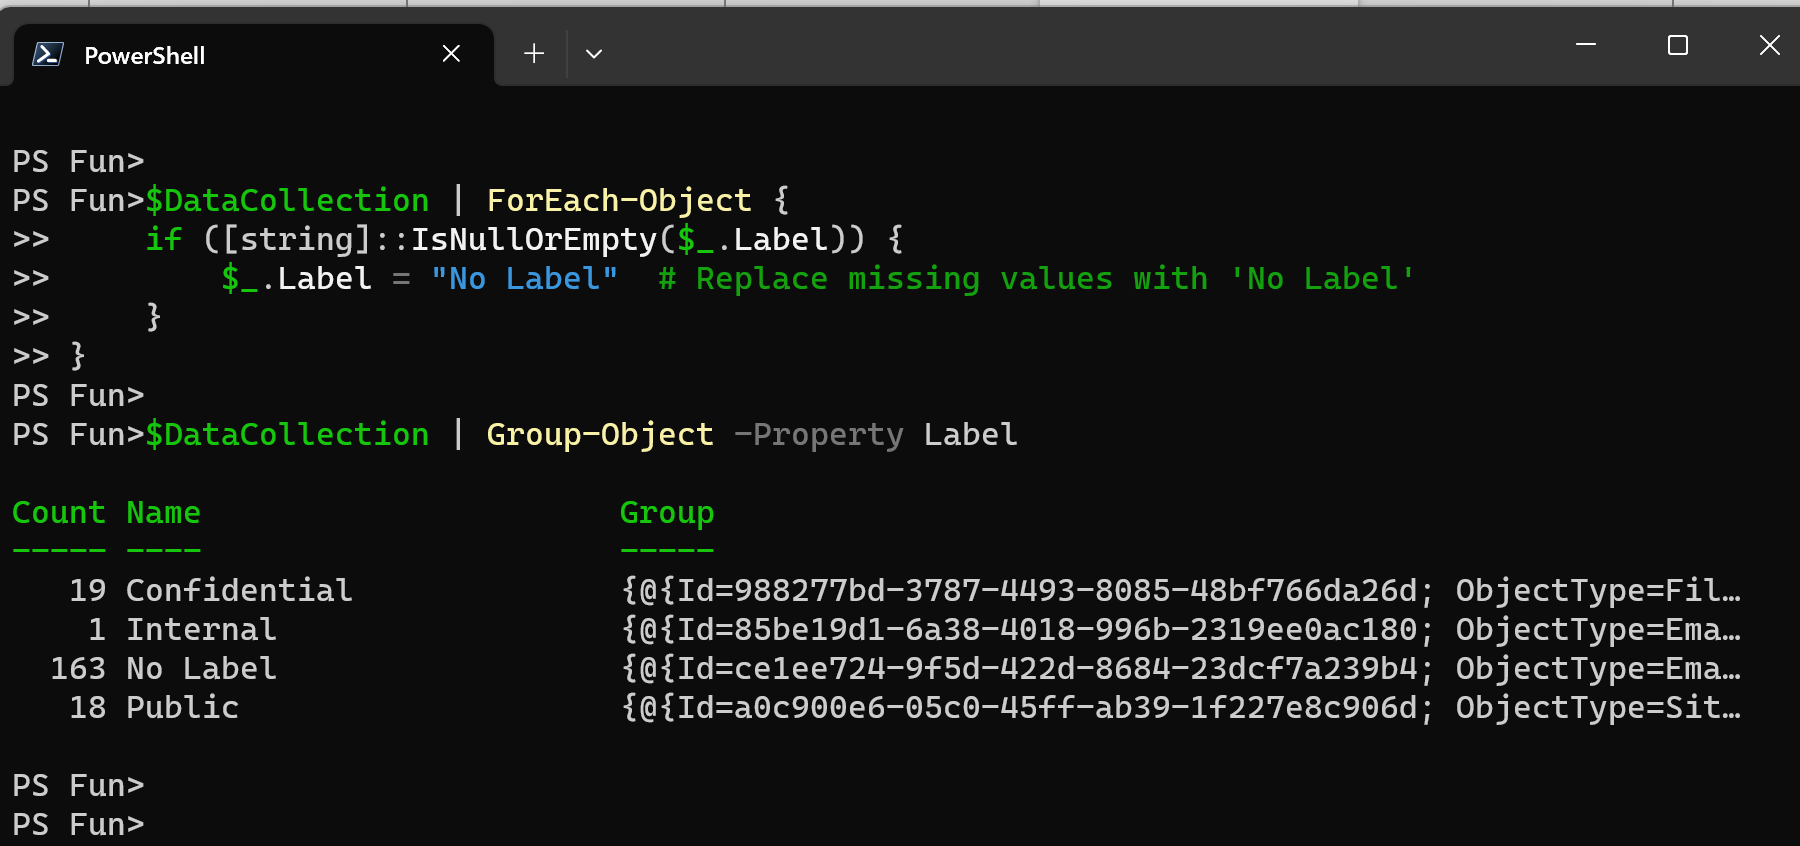
To handle missing values, we first need to identify them in specific columns or rows. We can utilize Where-Object and Group-Object to achieve this.
#Check if there are any missing values in Label column
$DataCollection | Group-Object -Property Label

After that we will need to replace missing data with some placeholder like “No value“, “N/A“, “Unknown“, 0 (if the column supposed to have only numbers in it) etc.
$DataCollection | ForEach-Object {
    if ([string]::IsNullOrEmpty($_.Label)) {
        $_.Label = "No Label"  # Replace missing values with 'No Label'
    }
}
Outliers
The usual first step is to identify outliers, and the same set of cmdlets as previously can be used: Group-Object, Where-Object.
#Check if there are any outliers in SensitiveInformationCount column
$DataCollection | Group-Object -Property SensitiveInformationCount
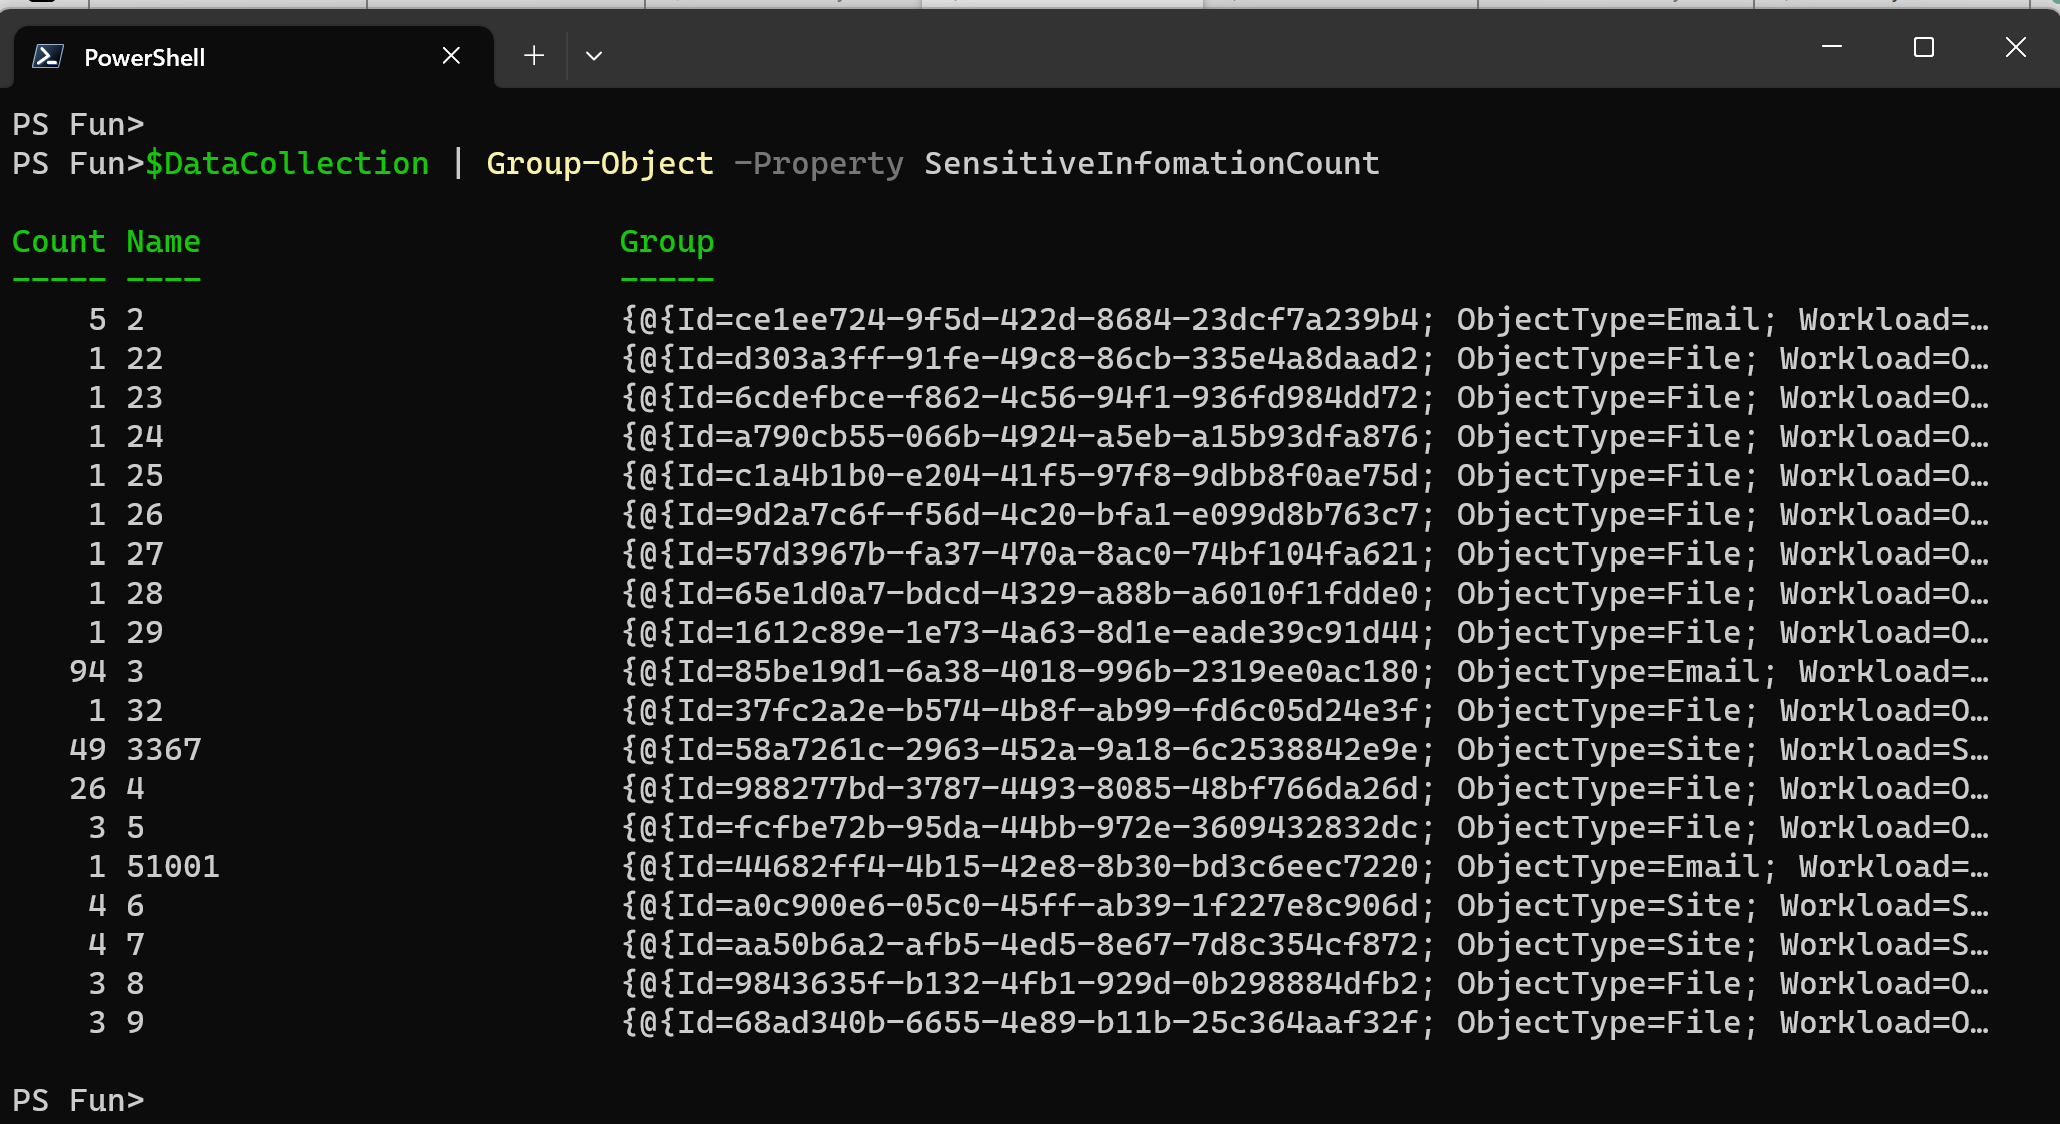
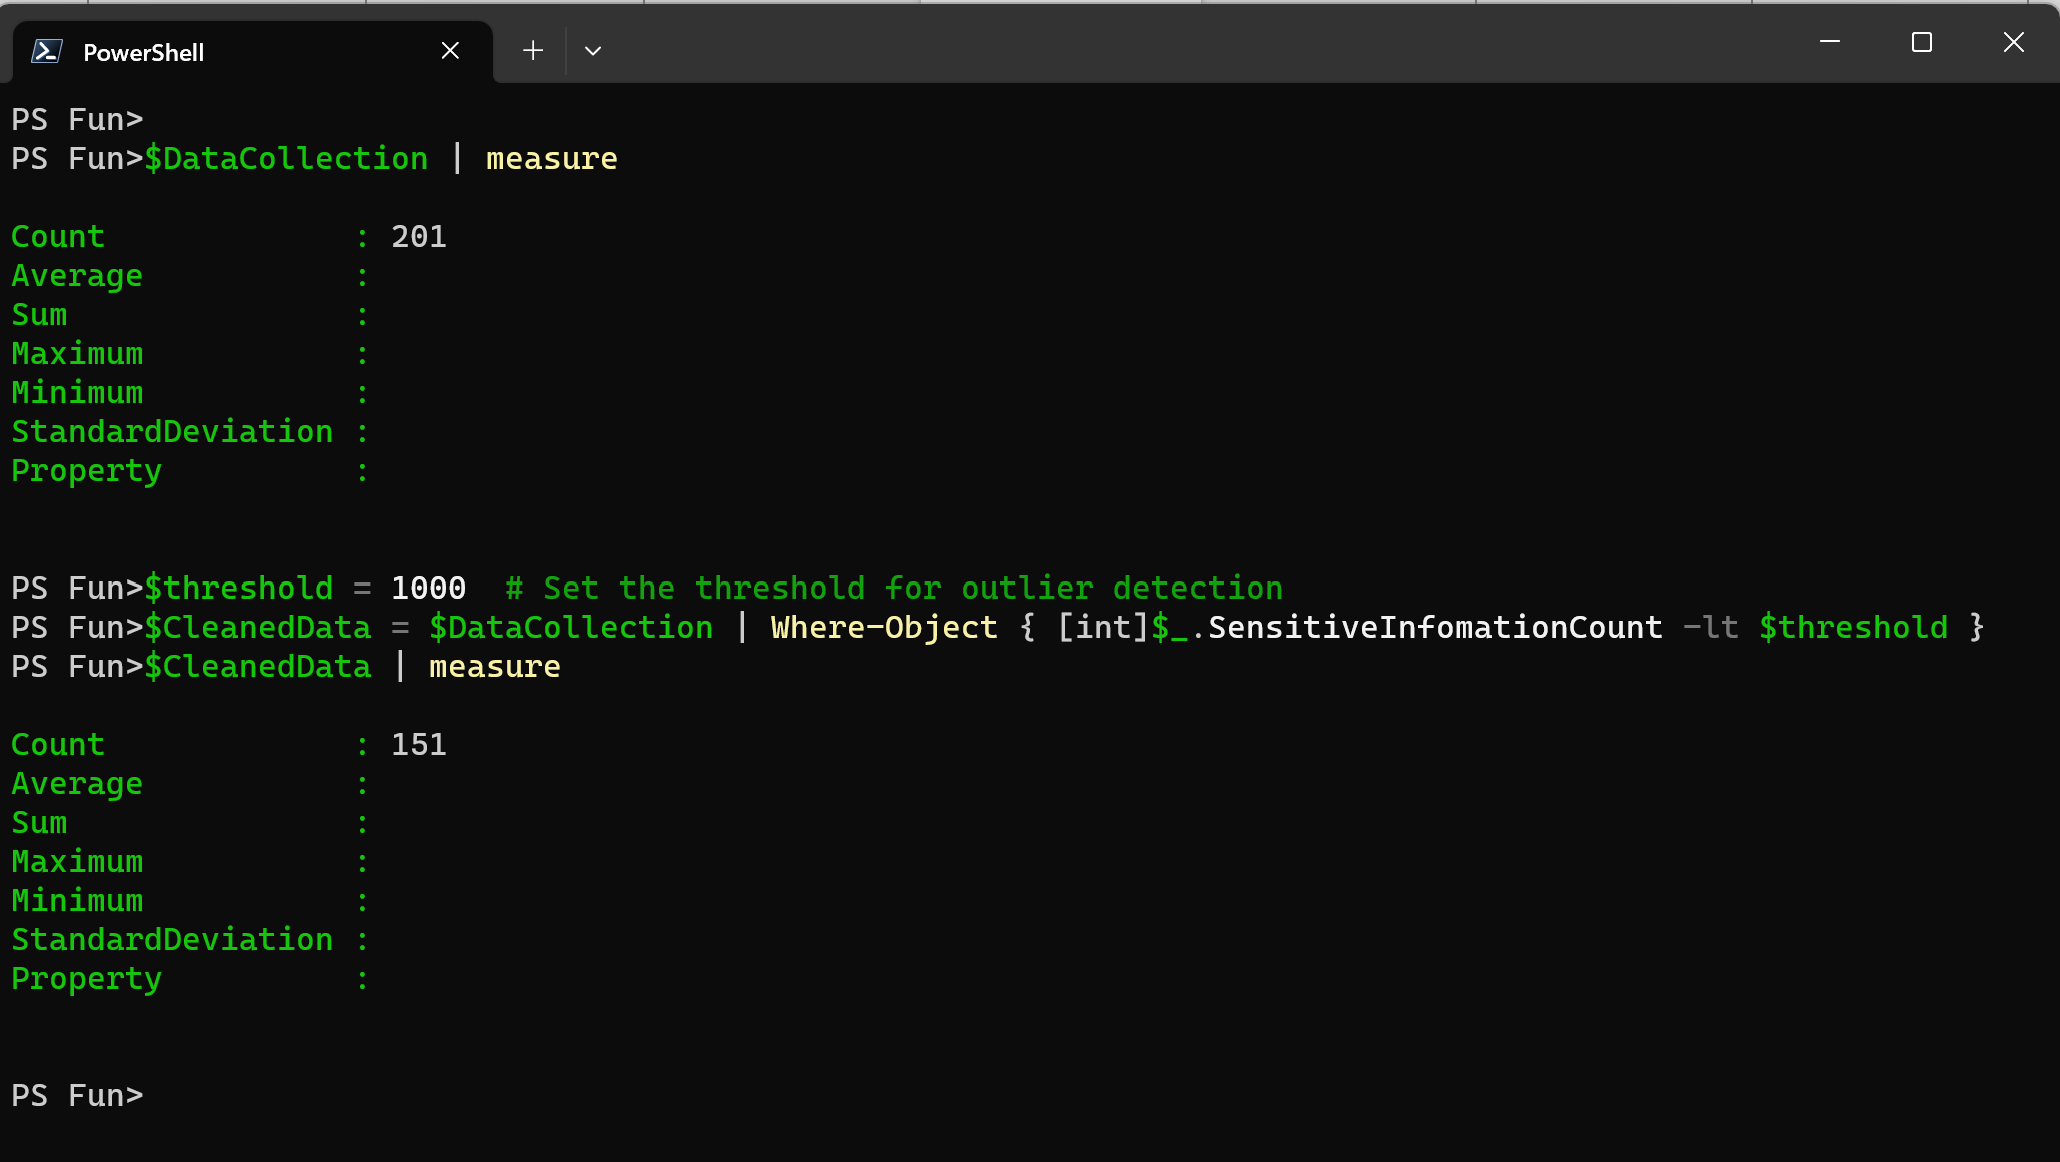
Once we identified the outliers, we can remove them from our data set or transform them to mitigate the impact on the data.
$threshold = 1000  # Set the threshold for outlier detection

$CleanedData = $DataCollection | Where-Object { [int]$_.SensitiveInfomationCount -lt $threshold }
Duplicates
To tackle this use case, we need to make sure to select only unique values. This can be achieved using Sort-Object cmdlet. Specifically, by using its -Unique parameter.

Inconsistency & Errors
Usually, inconsistencies are related to formatting, like phone number, SSN or Credit card numbers with or without the dashes.
With PowerShell we can use effortless String.Replace or time-tested and reliable regular expressions.
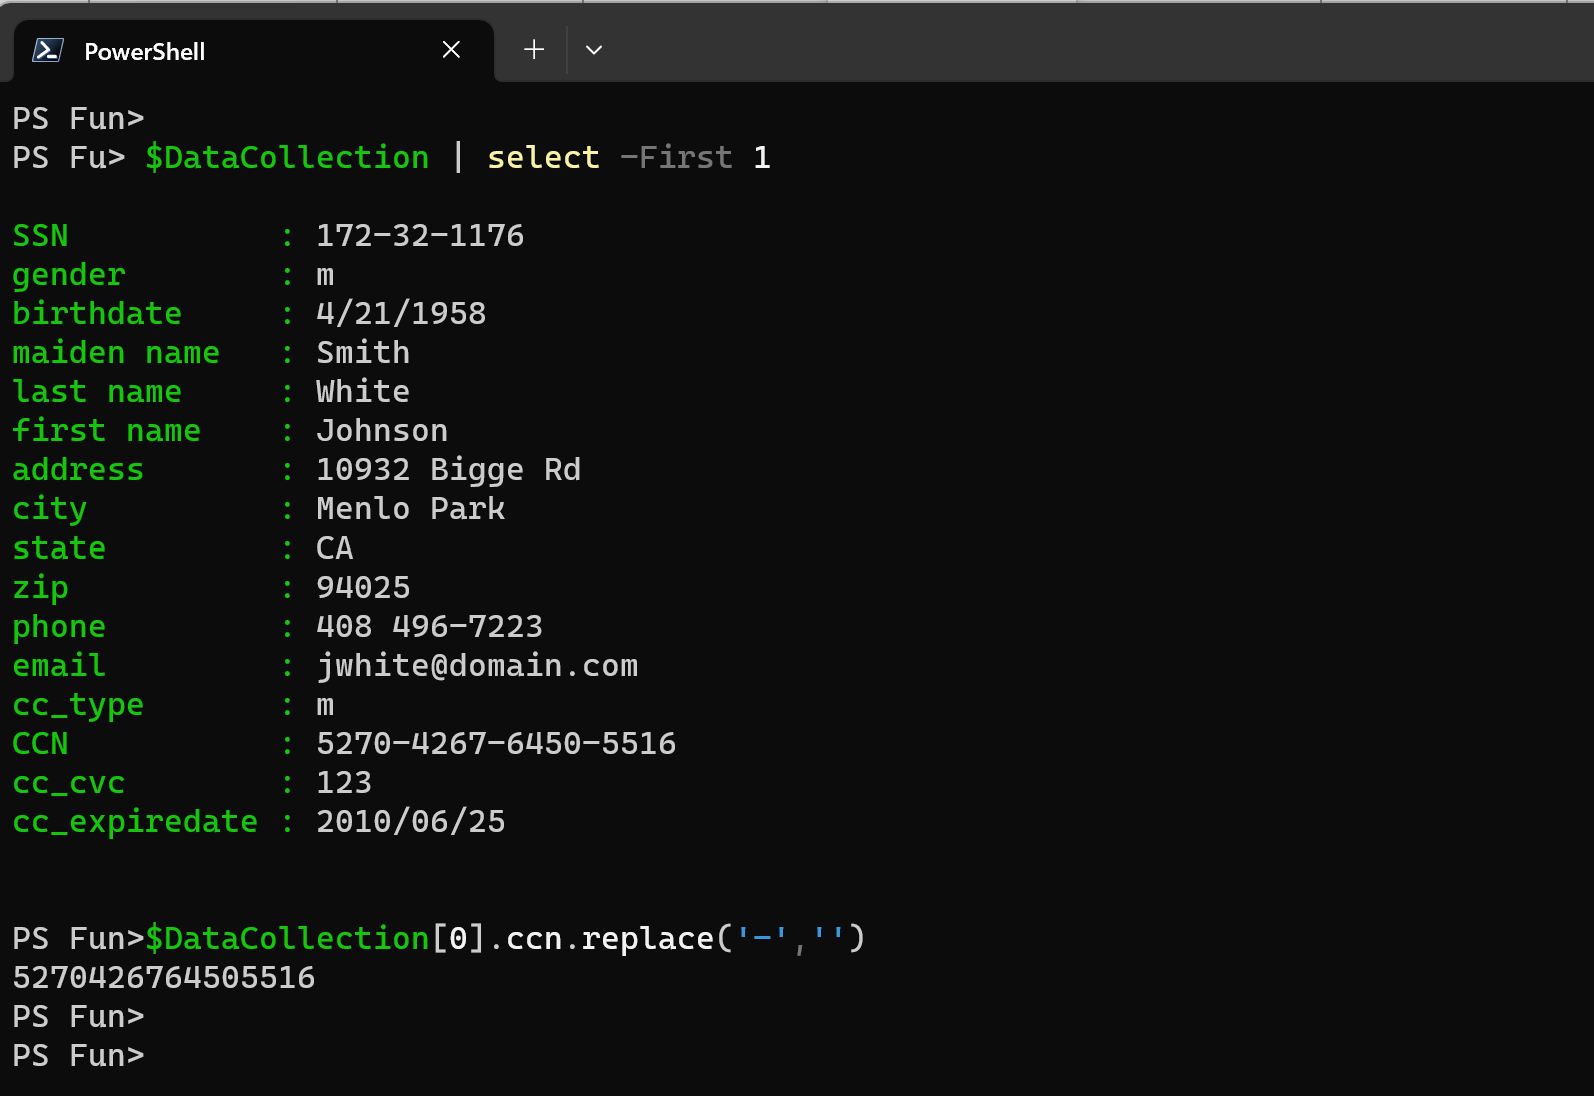
Note: Dataset used for the example is a dummy DLP data.
Community Provided
Number of modules with *clean*, *outlier* , *miss*, *duplicate*, *error*, *data cleaning* in the name – 906.
I would like to highlight few of them:
- ColumnMapper by Eric Hanko – finds all unique values in the column specified by the KeysHeader parameter and converts them to hash keys.
- TM-DataManipulation by Taylor Marvin – contains classes and functions designed to handle ranges of integers, and perform string operations.
Data Integration
Main goal here is to create a consolidated view of the data and set the ground for comprehensive analysis and decision-making in future phases.
Out of the Box
PowerShell provides out of the box mechanisms to merge and combine data, such as arrays, hash tables, or custom objects. Leading role here is taken by Join-Object cmdlet tha can be used to merge data based on common keys or attributes. Although this cmdlet is not part of the built in modules, the approach and proof of concept have been presented back in 2012 (more than 10 years ago) by Lucio Silveira at PowerShell Team Dev Blog.
It supposed to work similarly to SQL Join and link two collections based on some common denominator.
Here is one of the ways to do it using Where-Object:
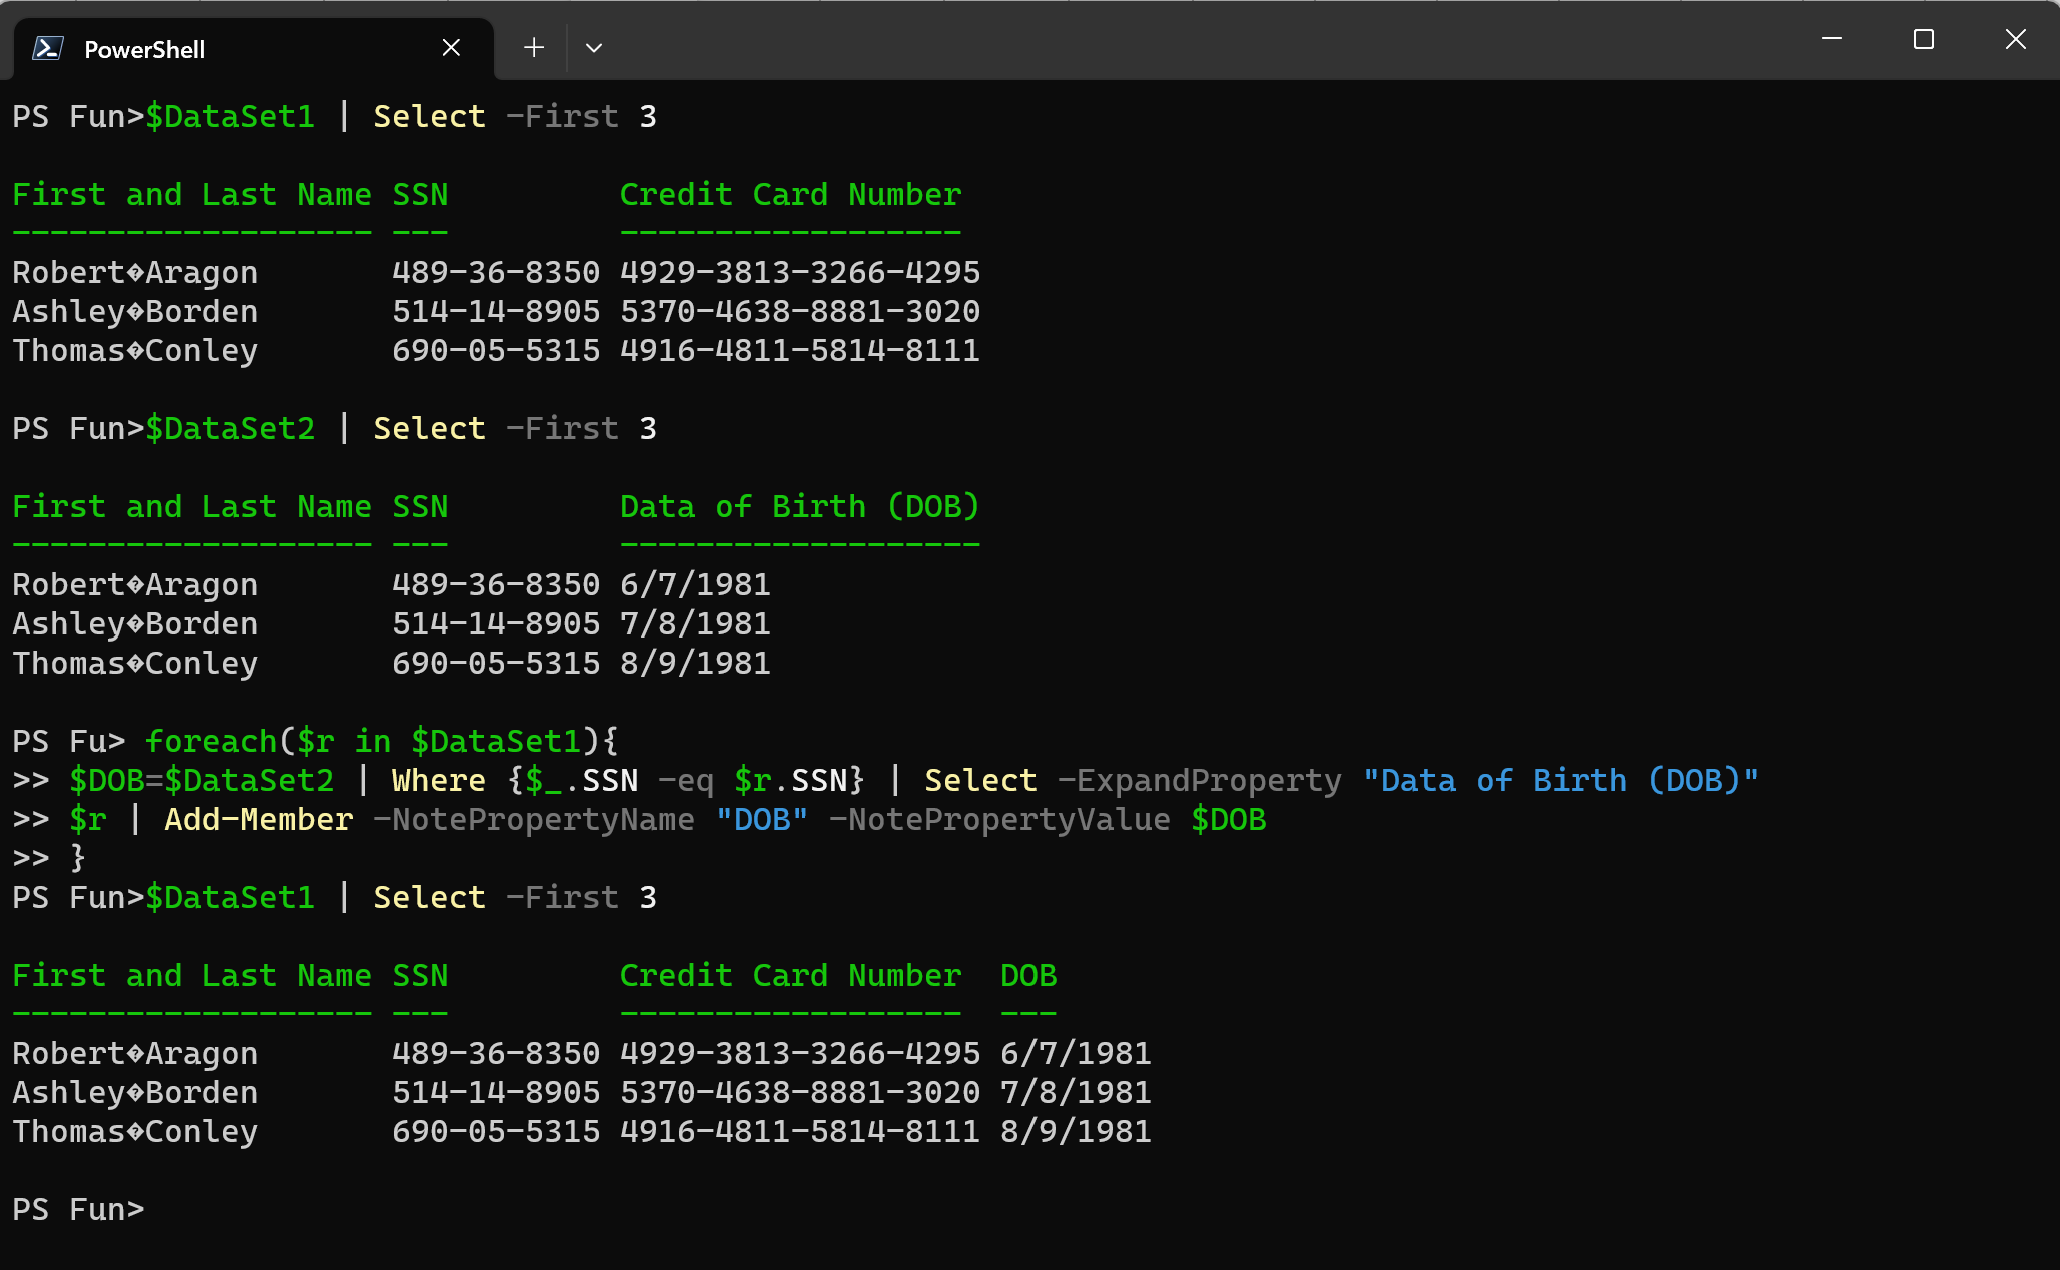
foreach($r in $DataSet1){
 $DOB=$DataSet2 | Where {$_.SSN -eq $r.SSN} | Select -ExpandProperty "Data of Birth (DOB)"
 $r | Add-Member -NotePropertyName "DOB" -NotePropertyValue $DOB
}
The drawback of this approach is that we are altering the input object by adding additional members to it and it might create more complexities going forward.
With Join-Object a new object is being created with the properties that you outline, leaving original objects intact:
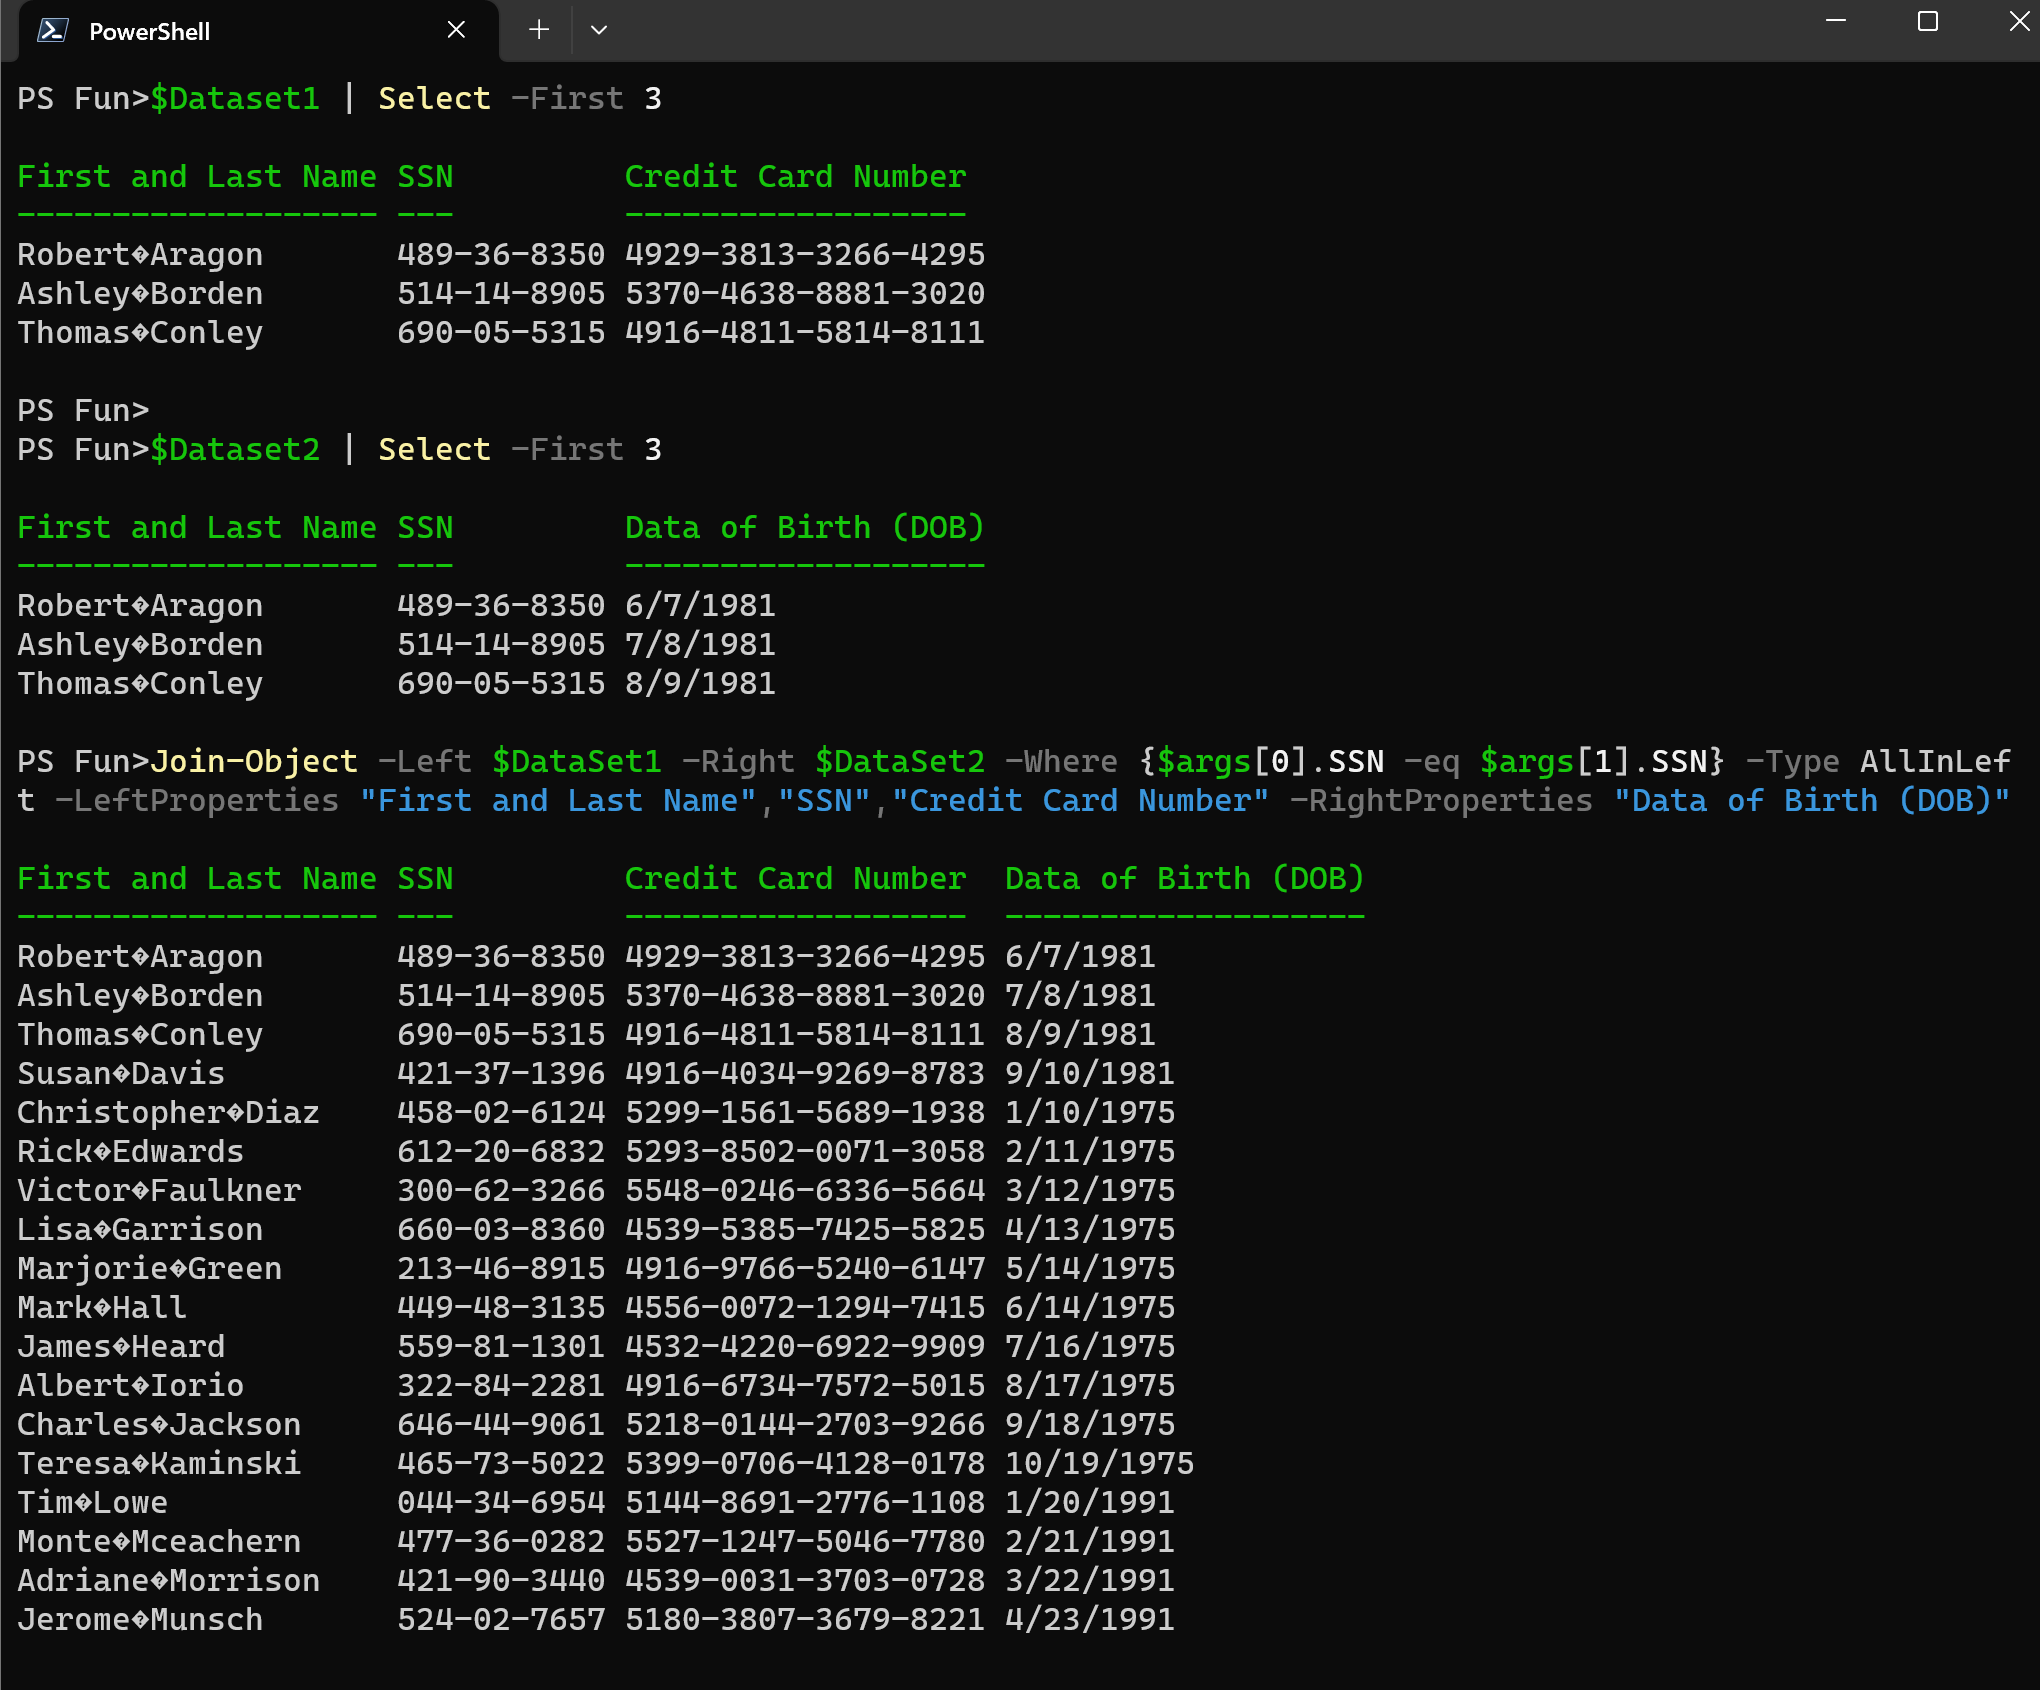
Join-Object -Left $DataSet1 -Right $DataSet2 -Where {$args[0].SSN -eq $args[1].SSN} -Type AllInLeft -LeftProperties "First and Last Name","SSN","Credit Card Number" -RightProperties "Data of Birth (DOB)"
Note: Dataset used for the example is a dummy DLP data.
Community Provided
Number of modules with *join* and *merge* – 275.
Few of them worth of highlighting:
- Join & JoinModule by Ronald Bode (aka iRon7) – combines two object lists based on a related property between them.
- Join-Object by ili (aka ili101) – join data from two sets of objects based on a common value. LINQ Edition
- Join-String by saw-friendship – join String from Array.
- Join-Strings by Joel Sallow – pipeline-ending cmdlet that will join all strings from the preceding pipeline.
- markdownmerge by @DonovanBrown (aka DarqueWarrior) – port of Markdown-include.
- MergeCsv by Joakim Borger Svendsen – merge CSV files and/or custom PowerShell objects based one or more shared ID properties.
Data Discretization
The purpose of discretization is to transform continuous data into discrete intervals or categories. It also helps to facilitate pattern recognition.
There are three well known discretization techniques:
- Equal Width Binning
- Equal Frequency Binning
- Custom Binning
Out of the Box
The typical built in cmdlets that we will be utilizing are: Measure-Object, Sort-Object, Where-Object and Add-Member. Majority of aforementioned cmdlets are part of the PowerShell.Utility module. To read more information about PowerShell.Utility module its cmdlets and use cases go to Unleashing the Full Potential of the PowerShell.Utility Module.
Equal Width Binning
This technique is useful when the data distribution is uniform. It divides the range of values into fixed number of intervals with equal width.
Let’s look at the example, where we have column “Age” and we would like to display it with width of 3 and 3 intervals.
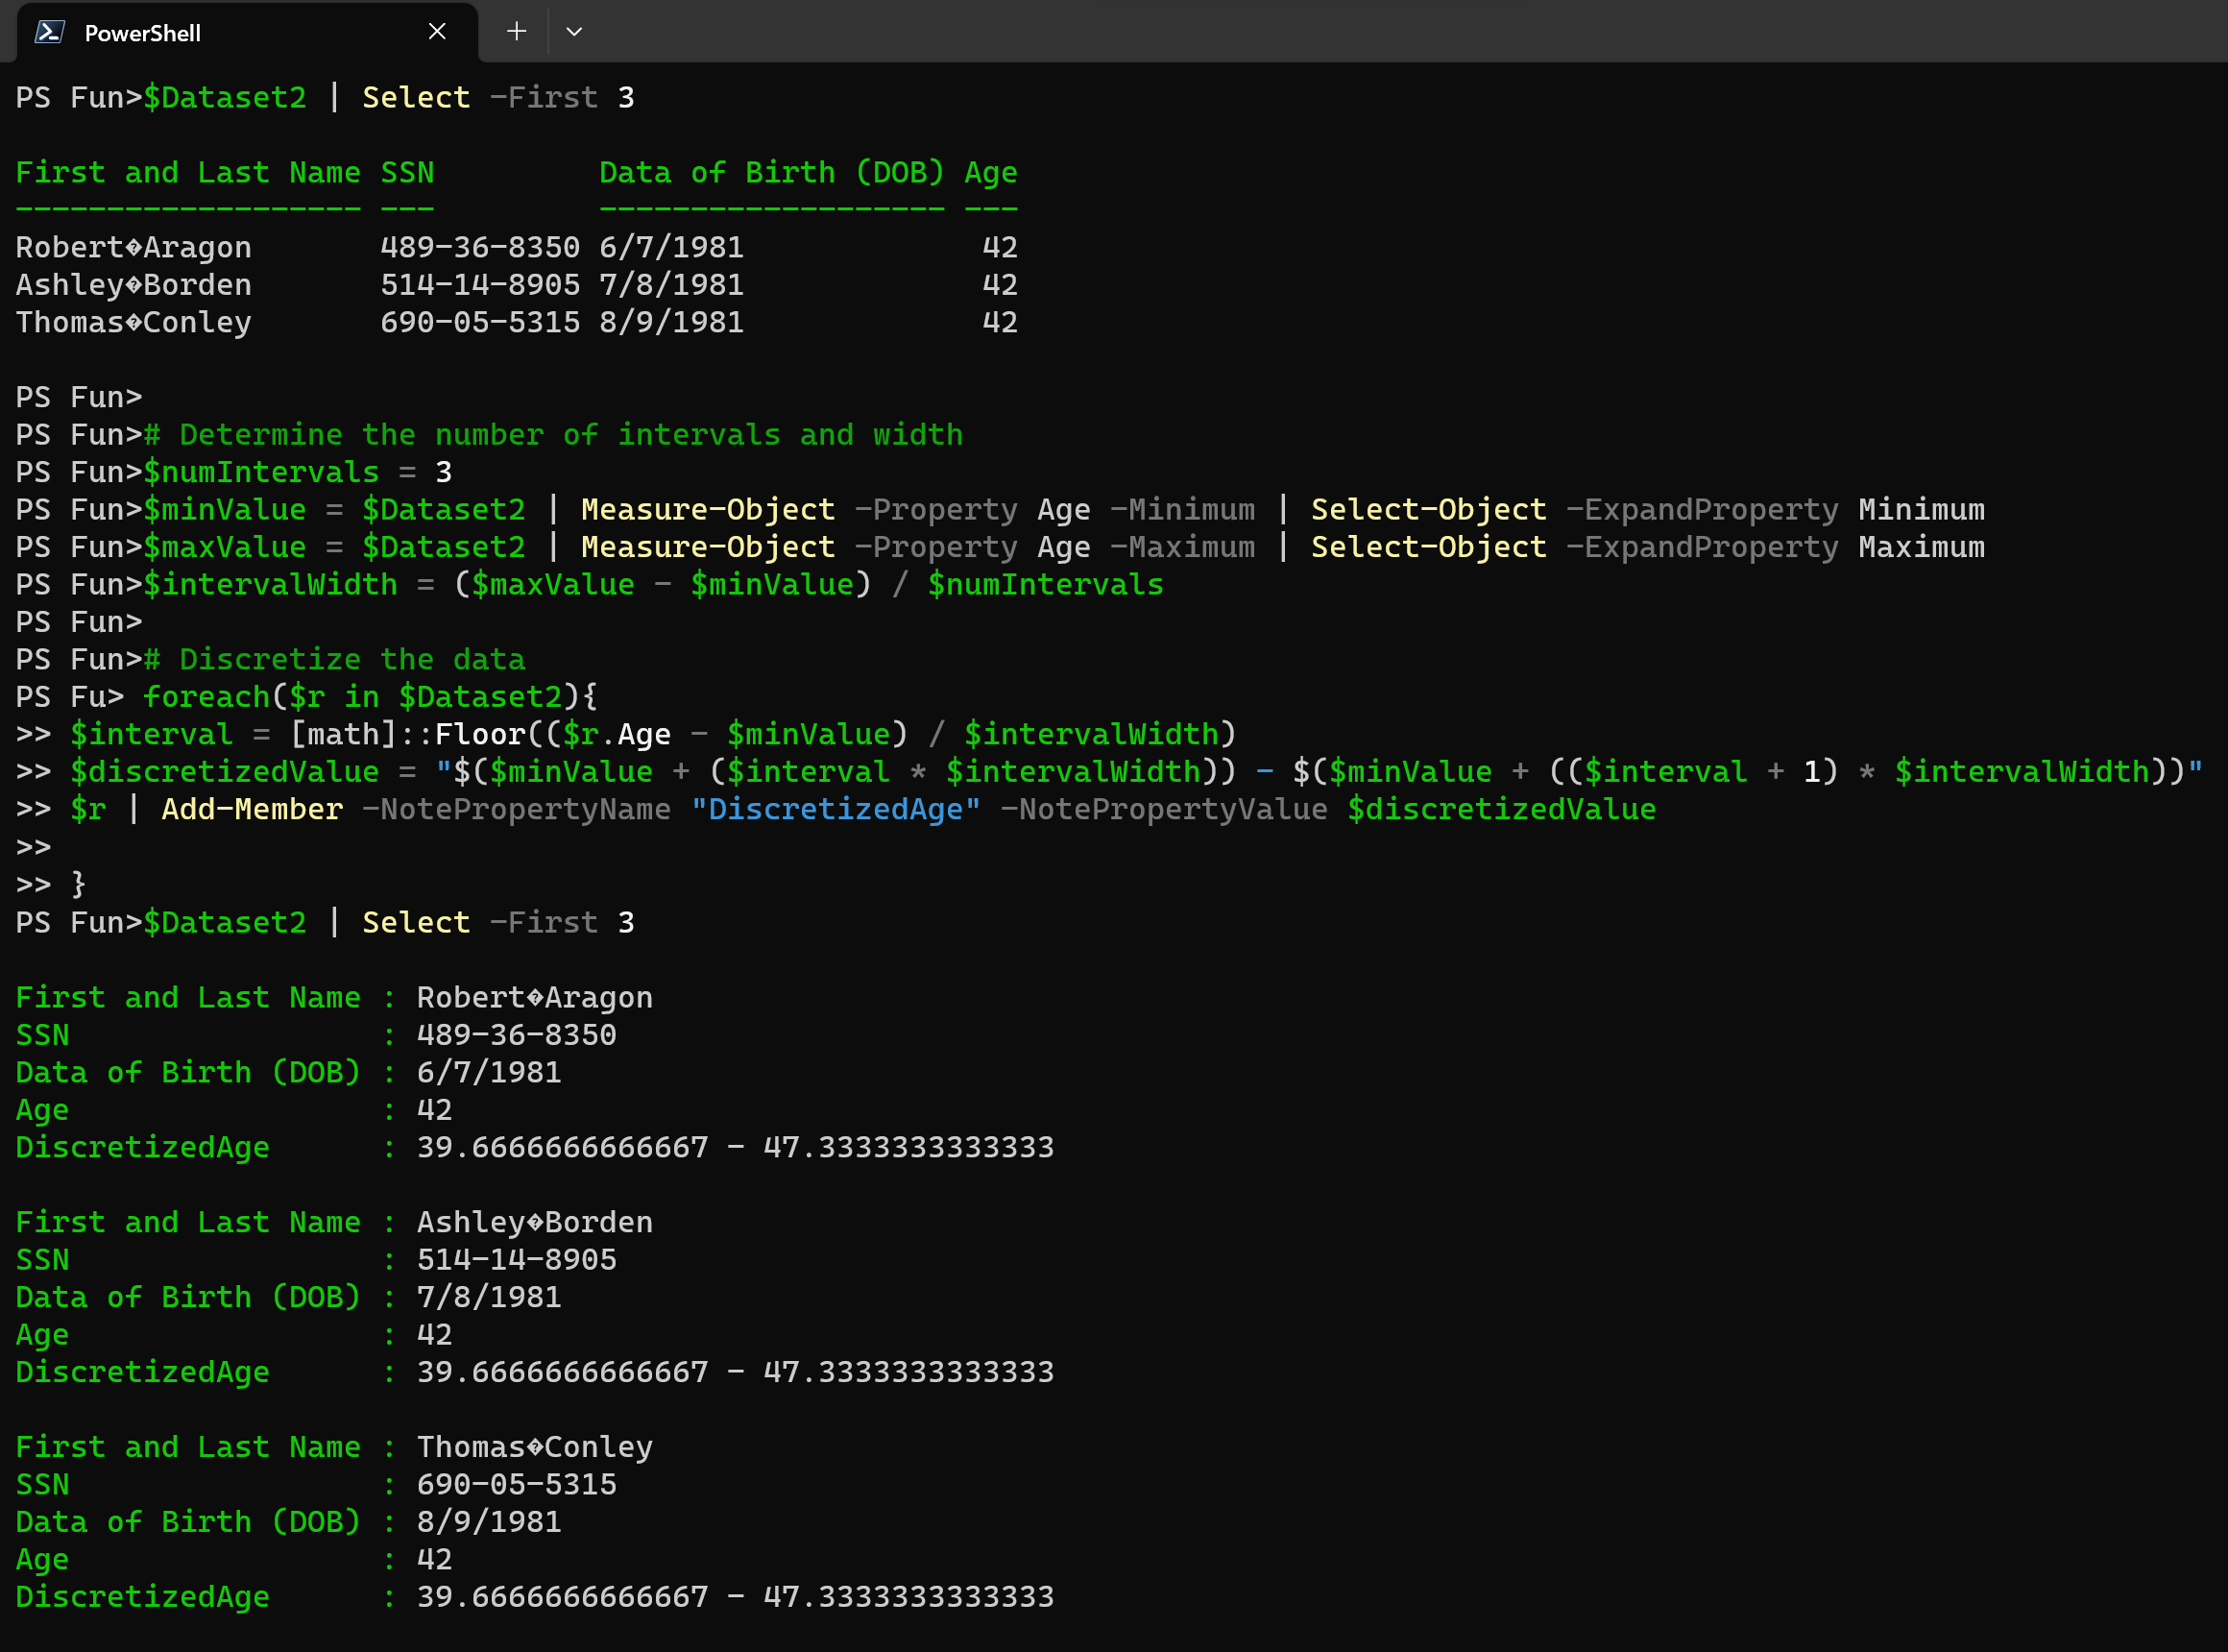
# Determine the number of intervals and width
$numIntervals = 3
$minValue = $Dataset2 | Measure-Object -Property Age -Minimum | Select-Object -ExpandProperty Minimum
$maxValue = $Dataset2 | Measure-Object -Property Age -Maximum | Select-Object -ExpandProperty Maximum
$intervalWidth = ($maxValue - $minValue) / $numIntervals

# Discretize the data
foreach($r in $Dataset2){
	$interval = [math]::Floor(($r.Age - $minValue) / $intervalWidth)
	$discretizedValue = "$($minValue + ($interval * $intervalWidth)) - $($minValue + (($interval + 1) * $intervalWidth))"
	$r | Add-Member -NotePropertyName "DiscretizedAge" -NotePropertyValue $discretizedValue

}
Equal Frequency Binning
This technique divides the data into intervals of equal frequency, ensuring that each interval contains a similar number of data points.
In our example dataset we have a numeric column called “Salary” and we will be discretizing it into three equal-frequency intervals.
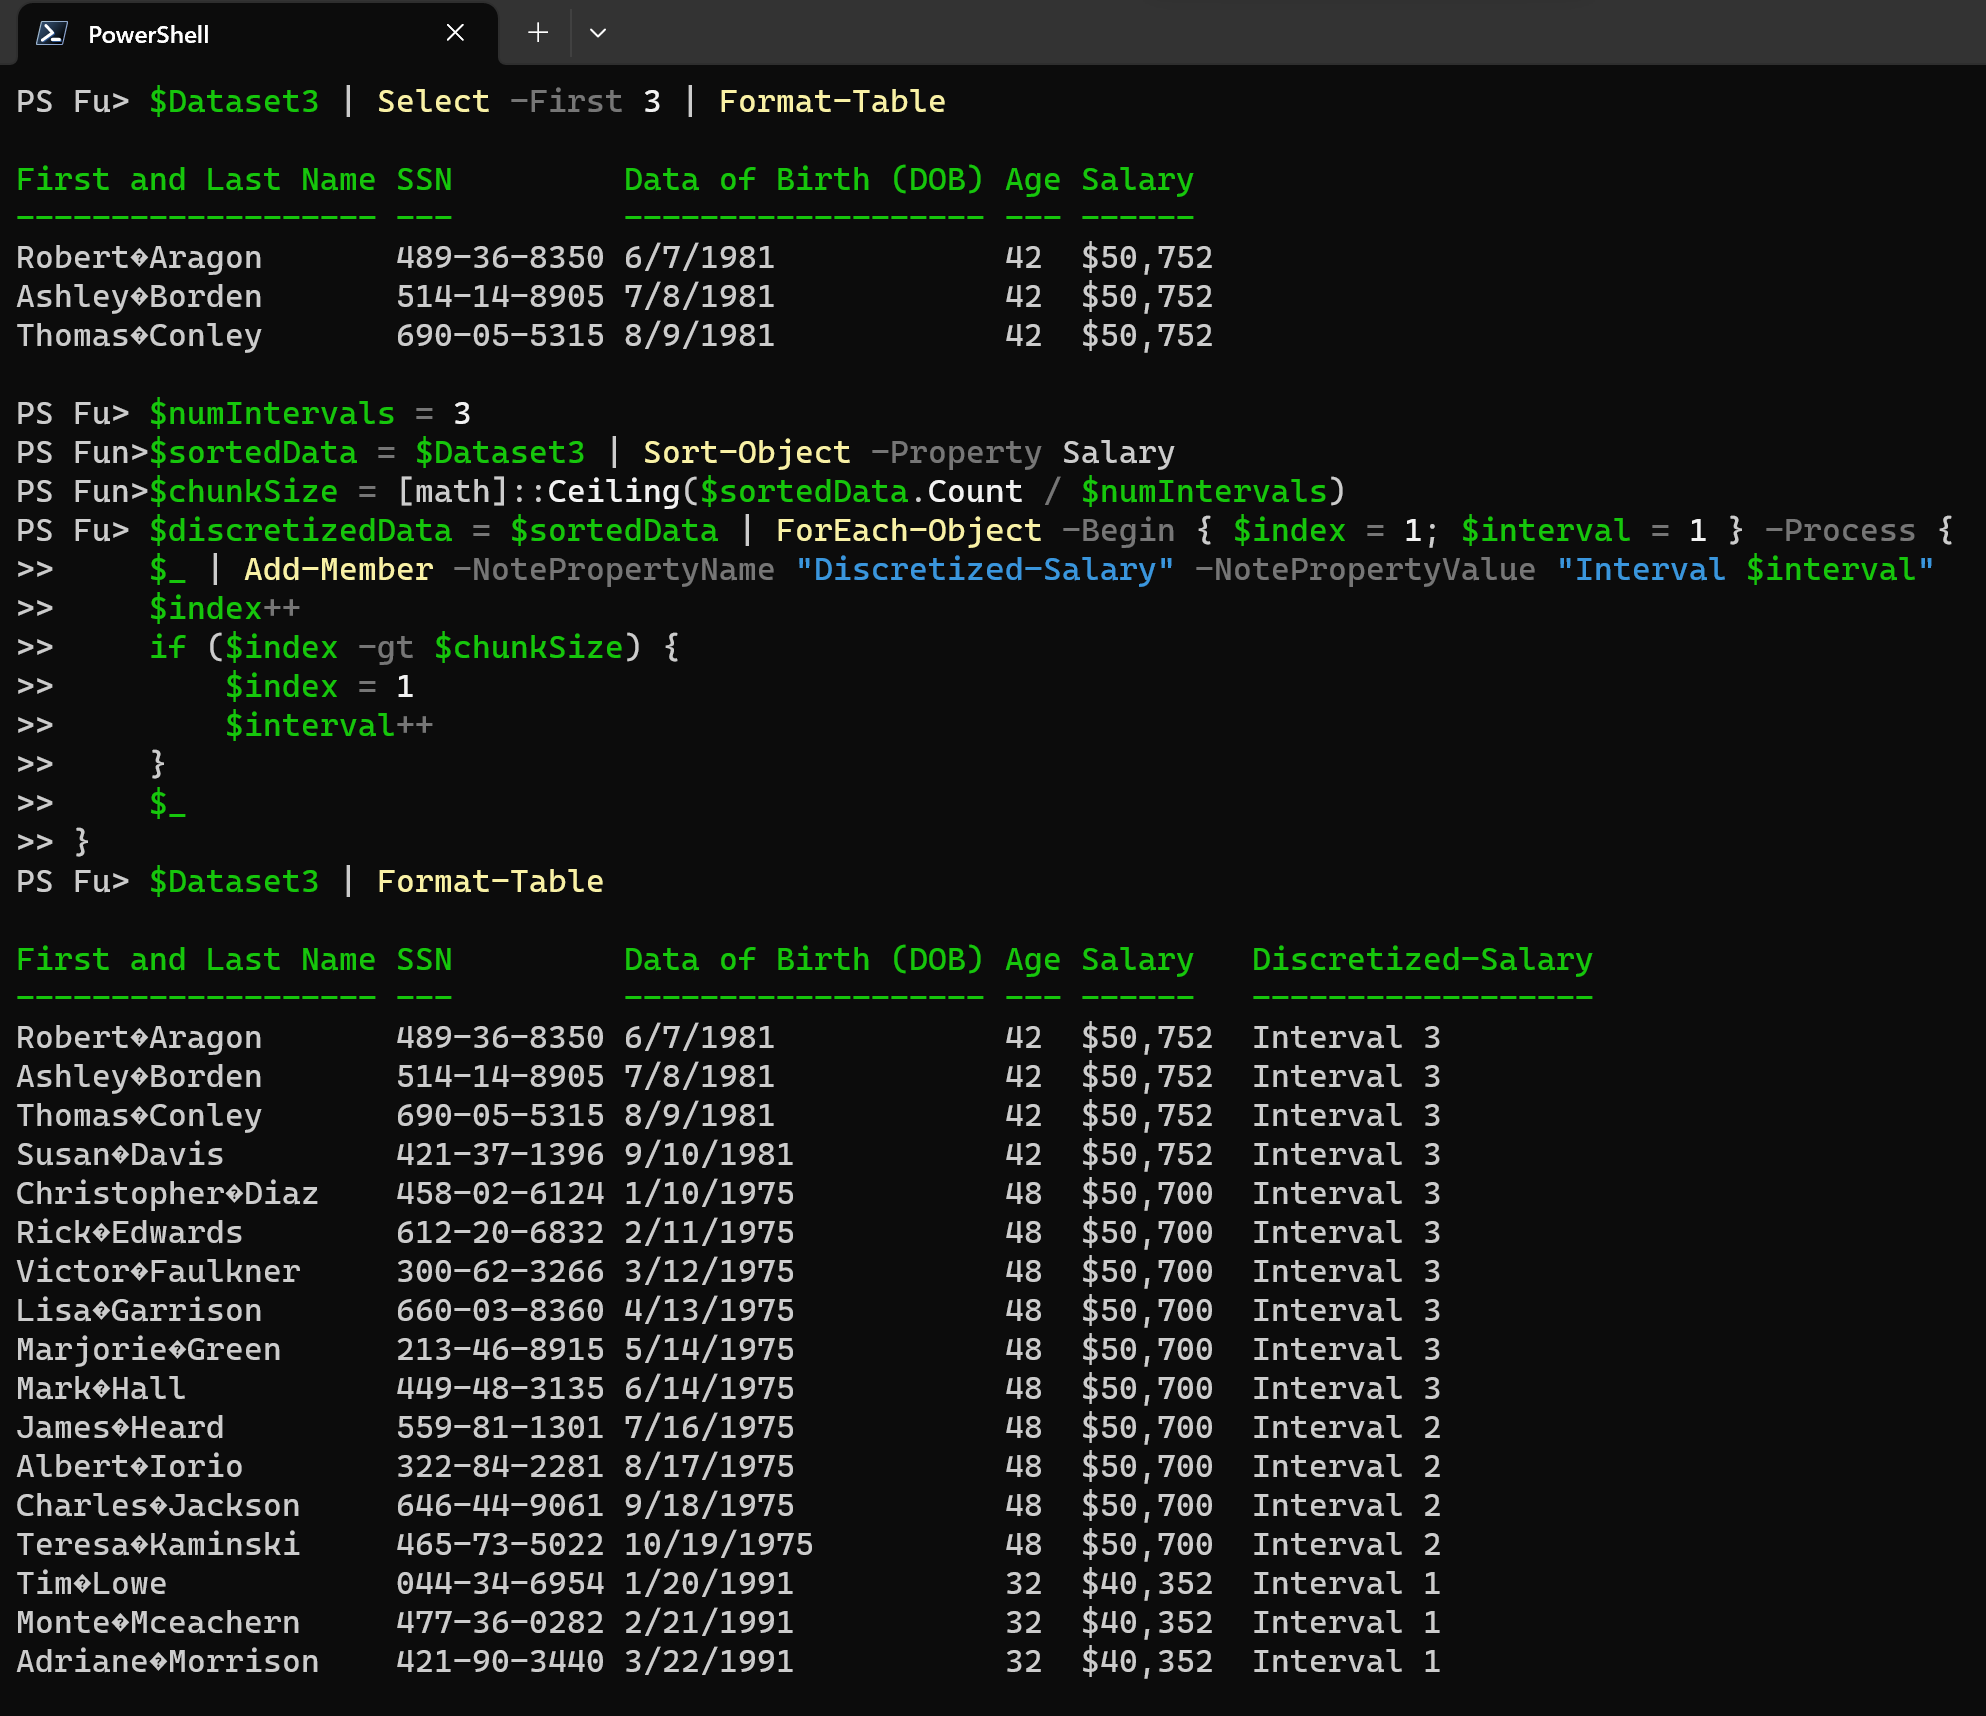
$numIntervals = 3
$sortedData = $Dataset3 | Sort-Object -Property Salary
$chunkSize = [math]::Ceiling($sortedData.Count / $numIntervals)
$discretizedData = $sortedData | ForEach-Object -Begin { $index = 1; $interval = 1 } -Process {
    $_ | Add-Member -NotePropertyName "Discretized-Salary" -NotePropertyValue "Interval $interval"
    $index++
    if ($index -gt $chunkSize) {
        $index = 1
        $interval++
    }
    $_
}
Custom Binning
This one allows to define custom intervals based on specific requirements or domain knowledge.
Let’s dive into the example.
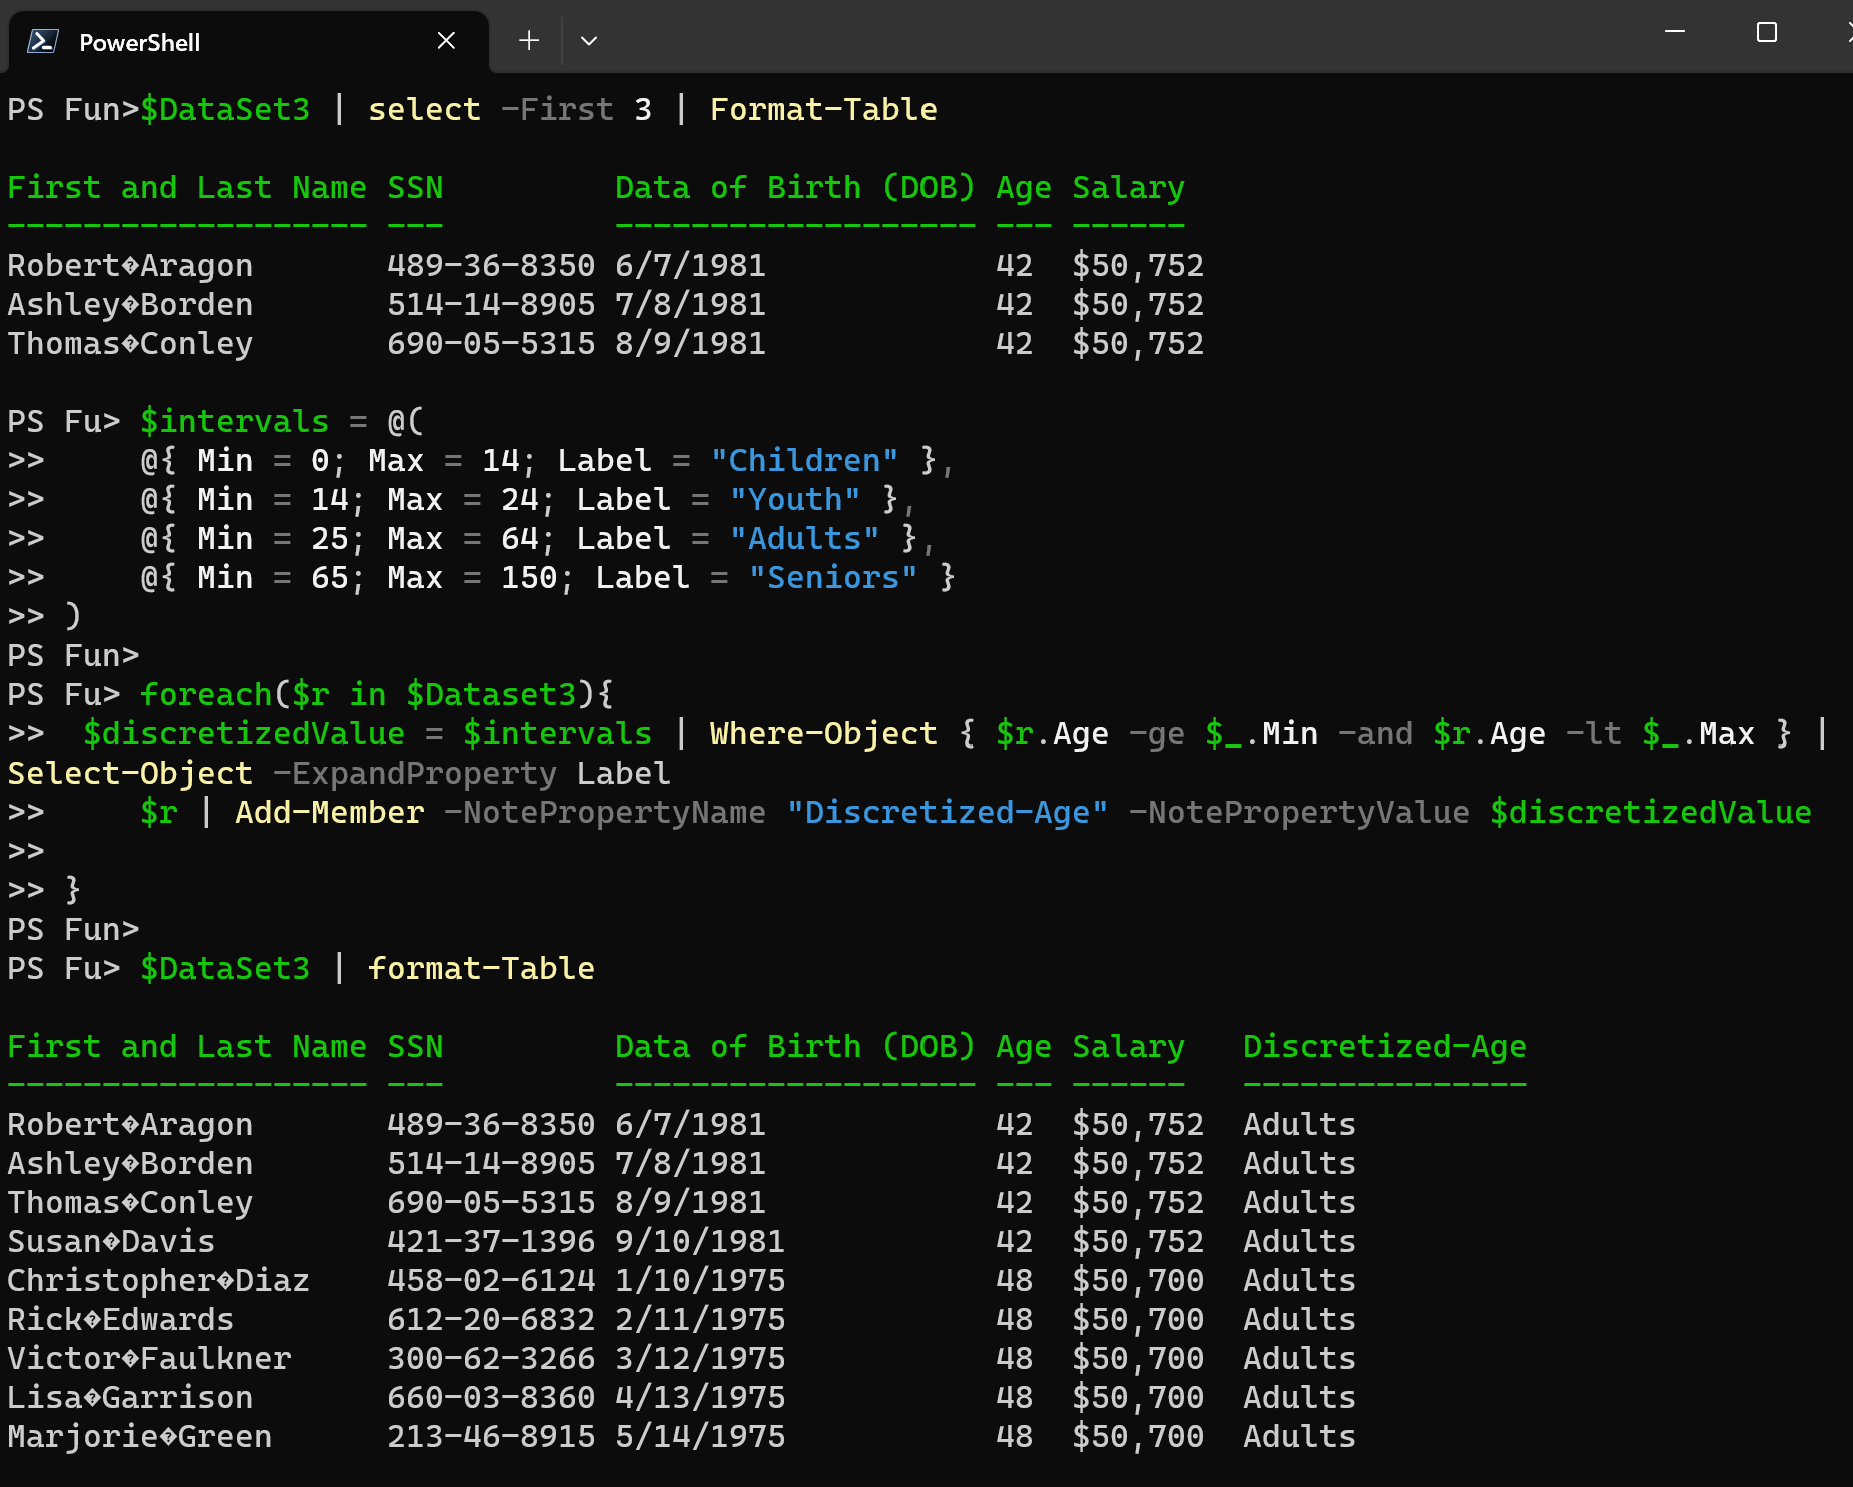
$intervals = @(
    @{ Min = 0; Max = 14; Label = "Children" },
    @{ Min = 14; Max = 24; Label = "Youth" },
    @{ Min = 25; Max = 64; Label = "Adults" },
    @{ Min = 65; Max = 150; Label = "Seniors" }
)

foreach($r in $Dataset3){
	 $discretizedValue = $intervals | Where-Object { $r.Age -ge $_.Min -and $r.Age -lt $_.Max } | Select-Object -ExpandProperty Label
    $r | Add-Member -NotePropertyName "Discretized-Age" -NotePropertyValue $discretizedValue

}
Next: Data Transformation Made Easy with PowerShell – Part 2.
Data icons created by Freepik – Flaticon.
Thanks a lot for reading.